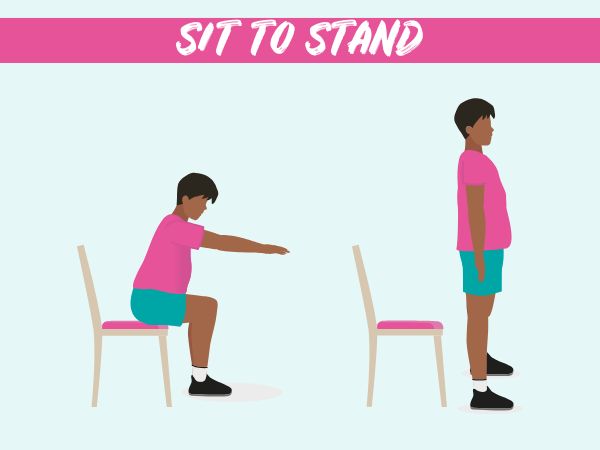
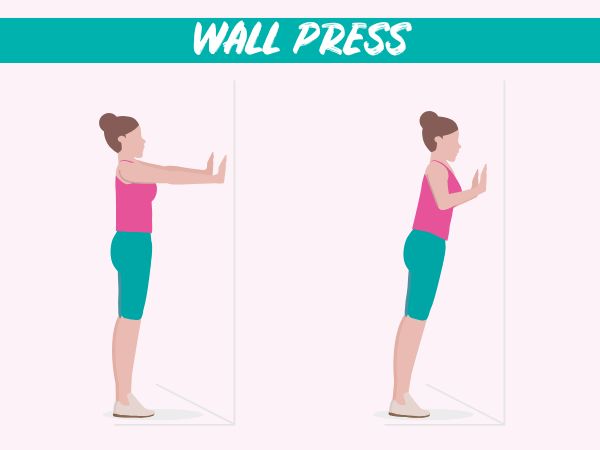
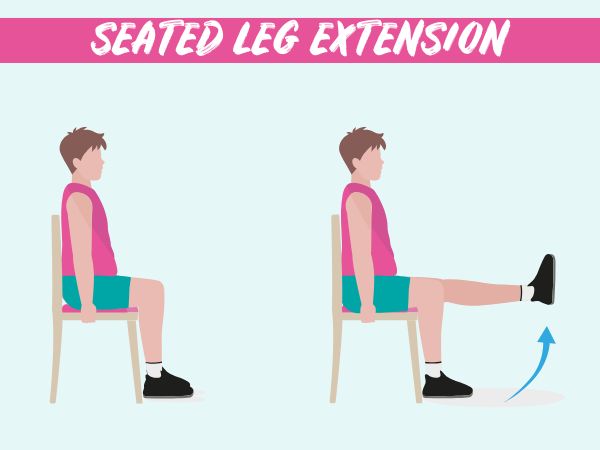
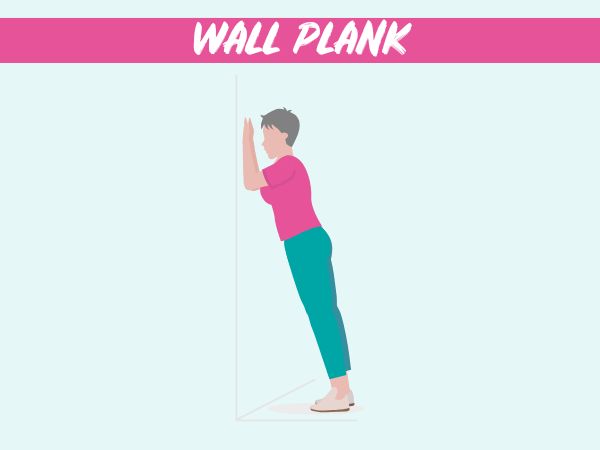
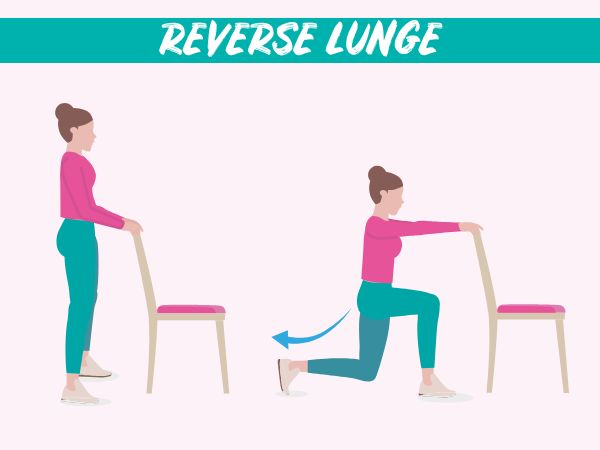
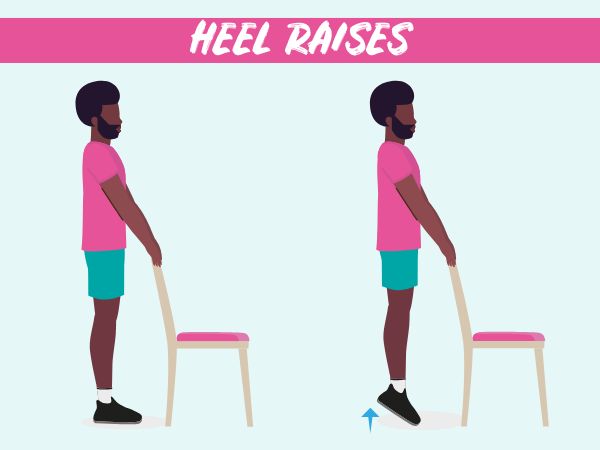
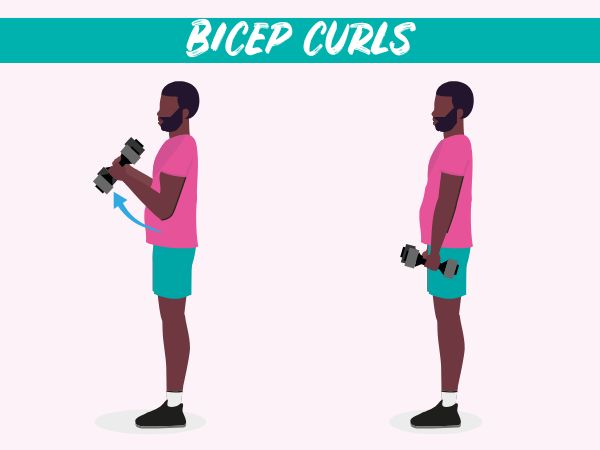
Doing these exercises at least twice a week will help to keep you strong. These exercises can be done alongside other physical activities.
If you have any health conditions, please ask advice from your health professional before starting these exercises.
The exercises will be available as a booklet which you’ll find in your local library after April and at any community event where Living Well service staff attend. If you’d like to get some copies for a community group or service please e-mail us here
Sit to stand:
Starting position
Sit on a chair: Make sure the chair is stable and on a flat surface.
Feet hip-width apart: Your feet should be flat on the floor.
Upright posture: Sit up straight, try not to bend in your back.
Arms position: Your arms should be crossed over your chest. If this is too hard, put your arms in front of you, at shoulder height, if possible, for balance.
Movement (Standing phase)
Lean forward slightly: Shift your weight forward by leaning your upper body slightly.
Push through heels: Press through your heels (not toes) as you straighten your legs and stand up.
Extend fully: Stand tall, hips and knees should be in a straight line with your feet but try to avoid locking your knees.
Movement (Sitting phase)
Controlled descent: Return to sitting by pushing your hips back and bending your knees.
Sit gently: Finish by sitting gently, keeping control all the way down. Try not to collapse into the seat.
If you are ready to make sit to stand more difficult
Increase repetitions: Start with doing the exercise 8-10 times, gradually increasing as your strength improves.
Add resistance: Hold weights in your hands or use a resistance band around your thighs to make the exercise harder.
Starting position
Warm up first: Warm your upper body before doing this exercise. Do some simple arm circles or shoulder rolls.
Stand facing the wall: Position yourself about an arm’s length away from a wall. Feet should be hip-width apart, and body should be in a straight line.
Place hands on the wall: Hands should be slightly wider than shoulder-width, placed flat on the wall at about chest height.
Movement (Pressing phase)
Inhale and bend the elbows: As you lower your body towards the wall, bend your elbows and breathe in.
Lower the chest: Lower your chest towards the wall until your face or nose is about an inch away. Make sure your head, upper body and legs stay in one straight line.
Movement (Pushing phase)
Exhale and push back: As you press back to the starting position, breathe out and push through your hands. Fully extend your arms keeping a slight bend at the elbows to avoid locking them out.
Keep shoulders down: Make sure your shoulders stay down and away from your ears as you push, using your chest and triceps (the muscles at the back of your upper arm).
If you are ready to make wall press more difficult
Increase repetitions: Start by doing the exercise 8-12 times, gradually increasing as your strength improves.
Move feet farther away: The further your feet are from the wall, the more difficult the exercise becomes.
Decrease hand width: Narrowing the position of your hands on the wall will increase the focus on your triceps.
Starting position
Sit on a chair or bench: Sit upright with your back against the backrest.
Position your feet: Feet should be flat on the floor, hip-width apart.
Body alignment: Keep your back straight, relax your shoulders away from your ears and keep them back. Hold the sides of the chair or bench to stay balanced.
Movement (Extension phase)
Extend one leg: Slowly lift one leg out in front of you, tensing your stomach muscles, while straightening your knee and lifting your foot off the ground till your leg is straight.
Pause and squeeze: Hold the position for 1-2 seconds while your leg is stretched out in front of you and squeeze the muscles on the front of your thigh.
Movement (Lowering phase)
Slowly lower the leg: Gradually lower your leg back to the starting position, keeping control throughout the movement. Don’t let your foot drop down quickly.
Maintain core engagement: Keep your stomach muscles tensed and your upper body upright as you lower your leg back down.
If you are ready to make seated leg extension more difficult
Increase resistance: If the exercise starts to feel easy, loop a resistance band around your ankle and around the rear leg of the chair on the same side or use some ankle weights.
Hold at the end: Hold the position for 2-3 seconds at the end of each leg raise to work the muscles more in the back of your thigh.
Starting position
Stand tall: Keep feet hip-width apart, with knees slightly bent for stability.
Arms by sides: Your palms should face your thighs. If using weights, hold them with palms facing inwards.
Keep shoulders down: Relax shoulders away from your ears and keep your upper body straight.
Movement (Lifting phase)
Lift arms to shoulder height: Slowly raise arms in front until they are at shoulder height. They should be straight but with a slight bend at the elbows to protect joints.
Palms down: Palms facing down as your arms reach shoulder height.
Movement (Lowering phase)
Lower slowly: Don’t let your arms drop too quickly.
If you are ready to make arm raises more difficult
Increase resistance: Use weights, or water bottles to make it more difficult. Try using a resistance band. Hold one end in each hand and stand on the middle of the band, then raise your arms.
Single-arm raises: Raise one arm at a time, keeping stomach muscles tensed.
Starting position
Stand facing the wall: Position yourself an arm length away with your feet hip-width apart. Keep your hands flat against the wall at shoulder height, in line with your shoulders.
Maintain alignment: Keep a straight line from your head to your heels, lean forward and rest your elbows on the wall, keeping your palms pressed against the wall.
Movement (Holding position)
Engage your core: Tighten your stomach muscles to stop your lower back sagging. Hips should be level and aligned with your shoulders.
Hold the position: Hold for 15–20 seconds.
If you are ready to make wall plank more difficult
Gradual increases: Increase the hold time by 5-10 seconds each session. Build up to 60 seconds or more for each hold.
Adjust foot position: Step your feet back a few inches, creating a bigger angle between your body and the wall. This makes the exercise more difficult.
Starting position
Stand tall: Position yourself in front of a chair, about an arm’s length away. Stand with feet hip-width apart and your weight evenly distributed on both legs.
Hold onto the chair: Use the chair for support and balance. Put one (or both) hands on the backrest or seat, as needed.
Movement (Lunge phase)
Step back: Keep your legs hip-width apart and take a step backwards with one leg. Bend both of your knees as you lower your back leg down towards the floor. Make sure you keep the knee on your front leg in line with your ankle to make sure you don’t push it out too far.
Maintain an upright torso: Keep your chest up and your back straight. Try not to lean forward.
Movement (Returning phase)
Push through the front heel: To return to the starting position, push through the heel of your front foot and bring your back foot forward back to a standing position.
Control your movement: Make sure the return is slow and controlled to avoid injury and maintain muscle engagement.
If you are ready to make reverse lunge more difficult
Increase depth: As the exercise becomes easier, try to lower your back knee closer to the ground without touching it.
Single-arm support: Try using just one hand for support on the chair to engage your stomach muscles more.
Unassisted reverse lunge: As your balance and strength improves, do the exercise without a chair.
Starting position
Stand tall: Stand behind the chair with your feet hip-width apart, about 6–12 inches away from the chair.
Hands on the chair: Place your hands lightly on the backrest for support. Your grip should be relaxed not tight, you are only using the chair for balance.
Movement (Lifting phase)
Lift your heels: Slowly rise onto the balls of your feet, lifting your heels off the ground as high as you can. Keep your weight balanced between both feet.
Engage your calves: Squeeze your calf muscles to lift your heels, feeling the stretch at the top of the movement.
Movement (Lowering phase)
Lower your heels slowly: Gradually lower your heels back to the ground in a controlled way, keeping the tension in your calf muscles.
Stay stable: Keep your balance and control the movement. Don’t let your heels drop too quickly.
If you are ready to make heel raises more difficult
Single-leg heel raise: When you feel comfortable doing the exercise with both feet, try making it a little more difficult by doing it with one foot at a time.
Hold for longer at the top: Pause for a few seconds at the top of each heel raise to make your calf muscles work even harder.
Starting position
Stand or sit tall: Position yourself with your feet hip-width apart and your knees slightly bent if you are standing. Or sit with your feet flat on the floor if you are using a chair.
Hold weights: Grip the weights (or water bottles) with your palms facing forward and your arms down at your sides.
Movement (Curling phase)
Bend at the elbows: Slowly lift the weights toward your shoulders.
Focus on the biceps: Concentrate on squeezing your biceps (the muscles on the front of your upper arms) as you lift. Raise the weights in a controlled way, try not to swing them.
Movement (Lowering phase)
Lower slowly: Gradually lower the weights back down to the starting position, so that your arms are back at your sides, keeping a slight bend at the elbows to protect your joints.
Control the descent: Move slowly with control, feeling the stretch in your biceps as you lower the weights.
If you are ready to make bicep curls more difficult
Increase Repetitions: Start by doing the exercise 8-10 times, and gradually do more as your strength improves.
Increase weight gradually: Use heavier weights or fill the bottles with more water.
Alternating bicep curls: Lift one arm at a time. This will help you control the movement and work the muscles more.